
An Easy Pile Repair Solution for Do-It-Yourselfers
Published on May 1, 2023


The dry wet cycle of the tidal action in coastal environments leads to rapid deterioration of submerged piles. Shipworms and marine borers also attack timber piles and literally eat the pile away. When the cross section of the pile is reduced, this leads to lower strength of the pile and a safety concern that must be properly addressed.
In the last couple of decades various jackets made with fiberglass, or HDPE have been introduced to repair such piles. However, these jackets must be ordered to the specific diameter and length. This delays the project and significantly increases the shipping and storage cost of such products. The jackets often require epoxies or stainless steel hardware to create a tube around the damaged pile. This also adds to the cost and the use of chemicals could potentially harm the environment and delay permitting for the project.
New Repair Option
Form-A-Tube® is a new pile repair system that can overcome all the above shortcomings. This product is manufactured in the United States using a special UV-resistant Poly Vinyl Chloride (PVC). The strips are 6.28 (or 2p) inches wide and available in any length. The strips stack easily on a pallet for shipping and storage. A single pallet shown here has enough strips to make 50 tubes of 18-inch diameter by eight feet tall.
The strips have interlocking male and female connectors along their edges that snap together or slide into each other easily. Every strip adds exactly two inches to the diameter of the tube. Thus, connecting seven strips side by side makes a 14-inch diameter tube; eight strips produce a 16-inch diameter tube and so on.
The standard length of the strips is four feet or eight feet long. Longer strips can also be custom ordered. A unique feature of this product is that by connecting shorter pieces and staggering the joints, tubes of any length can be produced from short strip segments on the job site. Here three and one-foot-long strips are connected to a four-foot strip next to two, two-foot-long strips.
Installation Steps


The installation of Form-A-Tube® is very easy, most marina owners and operators can perform the repairs on their own. The steps are as follows:
Pass nylon banding through five or six spacers and secure them around the pile. These spacers are available in lengths varying between one and a half to three inches and create a uniform stand-off distance around the pile and position the Form-A-Tube jacket symmetrically around the pile. If the repair length does not go to the seabed, skirt pins that are three to five inches long can be similarly wrapped around the pile to support the tube at the desired elevation.
Connect as many strips as necessary together and apply duct tape to hold the strips together and prevent them from sliding while handling them.
Wrap the assembly of strips around the pile; the last piece can be slid in place or gently pushed in with a mallet.
A long piece of foam can be shoved between the tube and the pile to seal the bottom and prevent the concrete or grout from flowing out. Additionally, a pleated piece of plastic can be wrapped around the pile and secured to the pile with nylon banding below the skirt pins. Once the tube is resting on skirt pins, the plastic is folded over onto the tube and secured around it with nylon banding. This serves as a “diaper” and ensures no grout will leak out into the water.
For added safety, a couple of ratchet straps can be wrapped around the tube to help resist the pressure of the wet grout. Alternatively, 12-inch wide shrink wrap can be wrapped a couple of times around the tube. This not only helps resist the grout pressure, it also keeps the surface of the tube clean during the grout placement operation. The ratchet straps or shrink wrap can be removed the next day once the grout has hardened.
For placement of the grout, the tremie method is recommended. Insert the tube at the bottom of the annular space. The grout can be sourced from local hardware stores, and it is mixed and placed by hand or using a pump. As the grout is placed, gradually pull the hose up, making sure the tip of the hose is always within the placed grout. This procedure pushes the water to the top and the water spills over the top rim of the tube without mixing with the grout which could reduce the grout strength. The unique T profile of Form-A-Tube® grabs the grout and prevents any future movement of the tube.
As a last step, finish the top of the grout with a slope to allow any rainwater to flow away from the pile. It is also recommended to seal the top surface of the grout with a coating of paint.
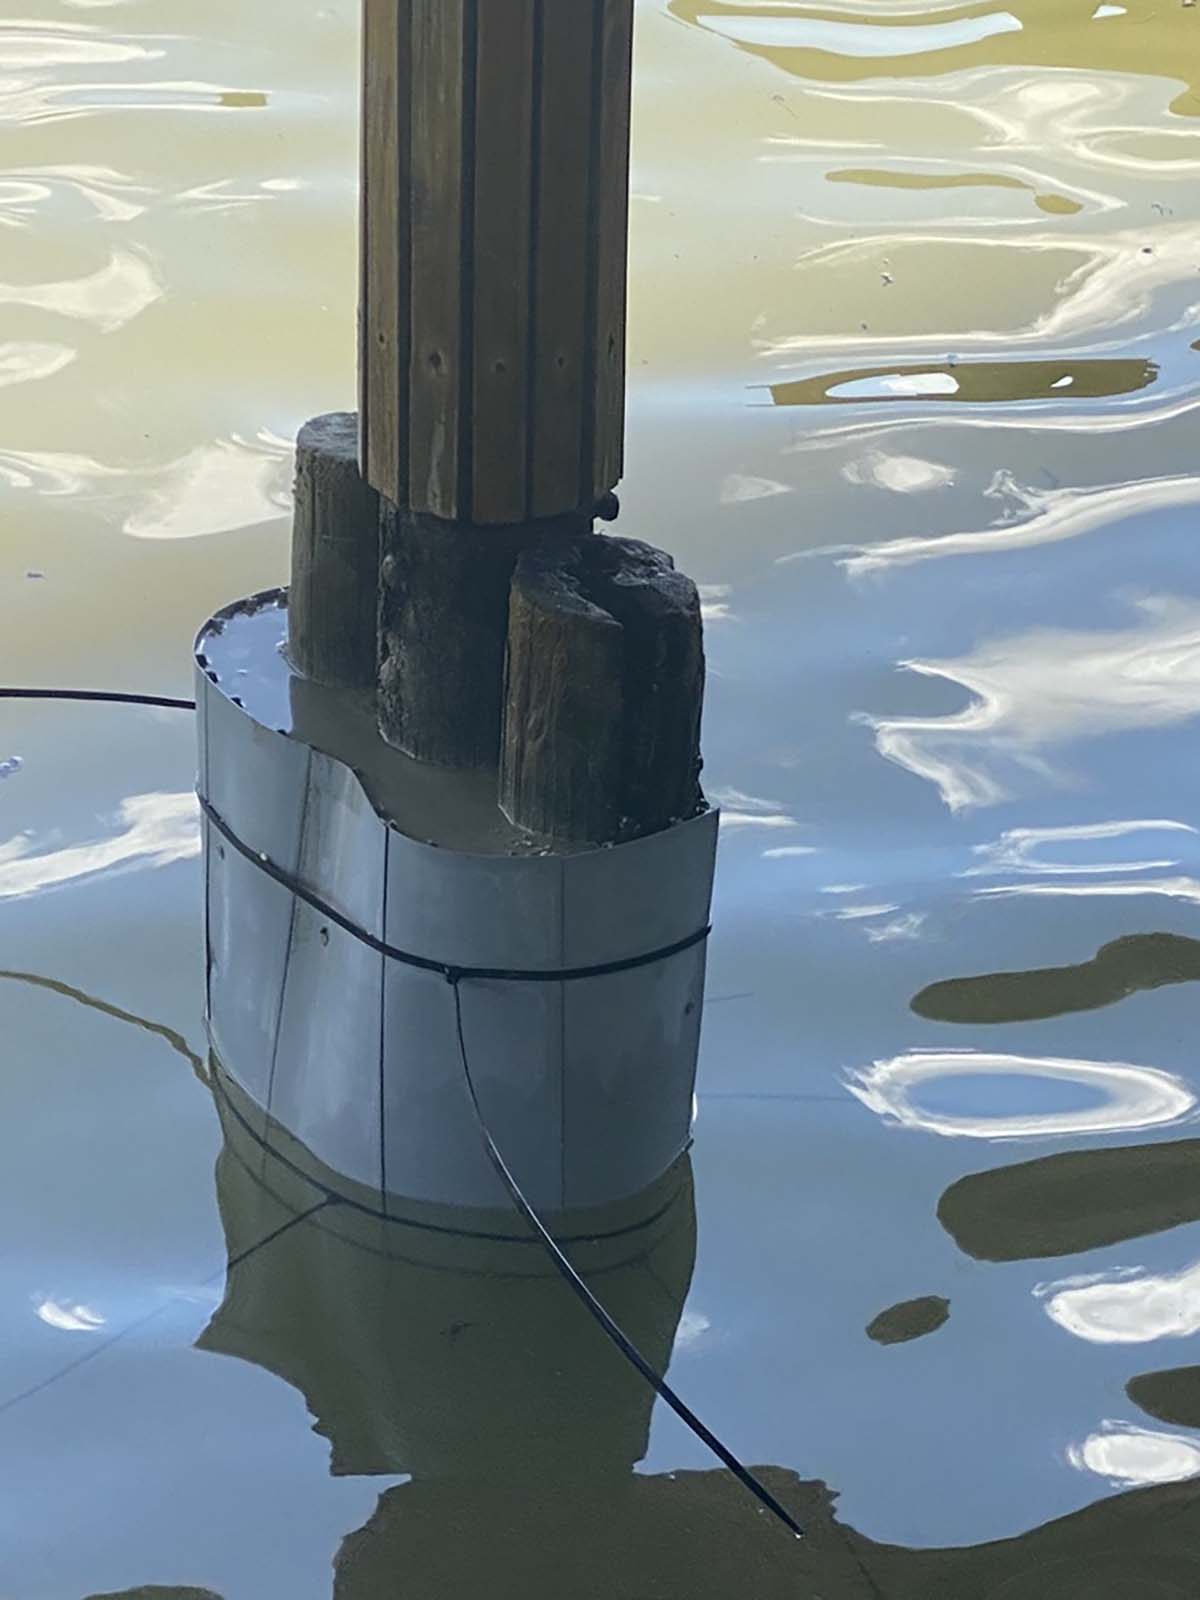
While most of the discussion has been on creating a circular tube, it is noted that once the strips are connected, they conform to most geometrical shapes. As an example, in this project a group of three piles were encapsulated in a tube that was oval shaped. If additional strengthening of the pile is desired, Glass Fiber Reinforced Polymer (GFRP) reinforcing bars can be attached to the spacers in step one. These nonmetallic bars never corrode, ensuring a long service life for the repaired pile. A video showing this installation procedure is available at: www.Form-A-Tube.com/videos.
Mo Ehsani, PhD, PE, SE, is president of QuakeWrap Inc. and centennial emeritus professor of Civil Engineering at The University of Arizona. He can be reached at mo@quakewrap.com.

| Categories | |
| Tags |